

Brewing coffee
Nespresso capsules contain 4 g of questionable grade coffee, and yet many of the world’s best restaurants, including the three Michelin-starred restaurant The Fat Duck in England (at time of writing), choose to use Nespresso machines... because pushing a button is much easier, and more consistent, than is brewing good coffee.
When Noma introduced speciality coffee to their drinks offer it took coffee trainer, Tim Wendelboe, eight months of training to get the staff up to the standard required for serving coffee in a two Michelin-starred restaurant. According to René Redzepi, an unexpected side-effect of this introduction was that the waiters suddenly felt much more motivated at work. They had ceased to be merely waiting and had, in effect, become creators of coffee. Through skill and understanding they were able to create delicious flavours using one of the most complex foodstuffs.
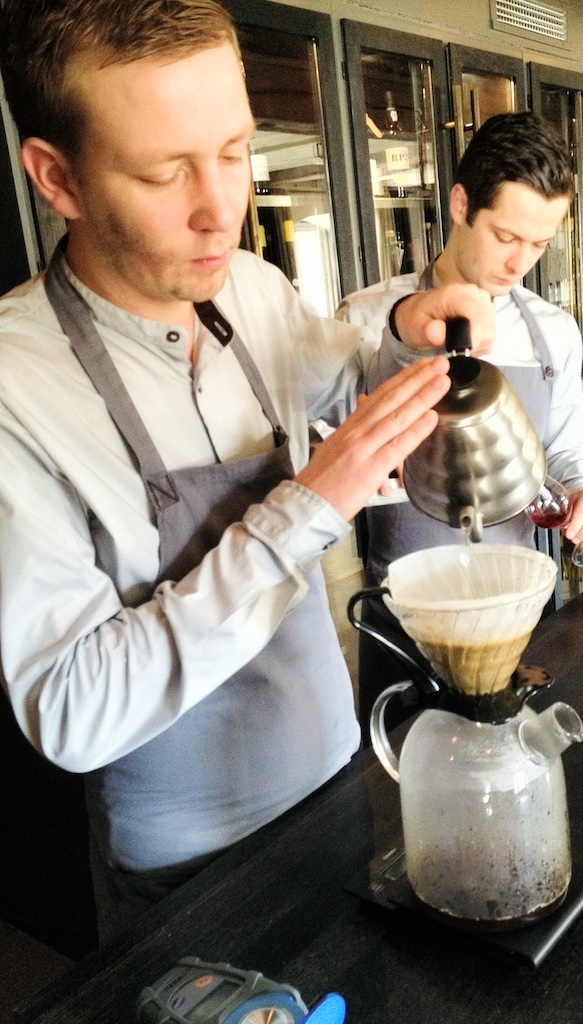
Photo by Tim Wendelboe
On a fundamental level, brewing coffee is simple: take coffee, add water. Yet brewing is difficult enough to make The Fat Duck decide in favour of plastic coffee pods. Coffee contains many different flavour compounds. Some of them are flavoursome, others are downright unpleasant. Our goal is to coax the delicious out and throw the disgusting away in order to produce a brew that tastes great. Coffee and water are our essential ingredients. The rest is down to taste and an understanding of how the variables change it.
Understanding the beans
I highly encourage you to read the agronomy section and to physically get yourself to origin to see it grown first hand. For now, though, I’d like you to simply associate the process that the beans have been through with the kind of flavours that you get as a result. An overview of the affect of processing is in Figure 1.4. Once you start to gain an understanding of how processing affects the flavour of the coffee﹣and how you should prepare it accordingly﹣your brewing will improve.

Figure 1.4 Graphical representation of harvest states and affect of processing. Depending on the care and grade of the coffee, the cherries are harvested in varying states of ripeness﹣the riper the cherry, the sweeter the bean. The processing further changes the flavour through varying contact with the fruit and differing levels of controlled and uncontrolled fermentation.
For a broad overview of the brewing process, Video 1.1 gives an example preparation method using the v60 coffee brewer:
v60 exercise
Tools
12 g coffee beans
v60 coffee brewer
v60 filter paper
Water
Method
- Weigh out 12 g of coffee beans.
- Wash out the filter paper and warm the v60 cone thoroughly with hot water.
- Grind the coffee finely (exactly which grind is dependent on previous tests. The burrs on the disks shear the beans into particle sizes of a narrow range. Each particle comprises many intact cells as well as ruptured cells). Much of the oil that contains the flavoursome aromas will now be exposed.
- Reweigh the grinds to check that you haven’t lost any in the grinder. Place the v60 brewer on the scales. Add your ground coffee. Zero the scales and start your timer.
- Take water that has just boiled and quickly pour 36 g of water into the bed, taking care to wet all of the coffee. The temperature of the water cools as it falls and will hit the coffee at around 91-94ºC (196-201ºF). The hot water displaces the air around the coffee grinds and CO₂ gas inside the bean cells rapidly expands as it heats up and escapes through the semi-permeable membranes of the cell walls. This then bubbles through the slurry causing turbulence and hoists some of the grinds out of the water and on top of the bloom.
- To make sure that all of the grounds are wet, stir the bed like a Kama Sutra expert, then top up with water to take the scales to 50 g.
- After 30 seconds, pour in another 50 g of water, starting in the centre of the cone and working your way outwards in a spiral. Take care to wash down any grounds that have become stranded on the sides. The temperature of the coffee slurry is likely to drop down to 70ºC (158ºF).
- After 1 minute has passed, add another 50 g water.
- At 1 minute 30 seconds, add another 50 g water. Wait until the last drop of water has fallen before removing the cone.
- In the cone are the spent coffee grounds, along with around 22 g of water. In the cup are the coffee solids suspended in around 178 g of water.
What just happened?
Coffee is a complex chemical mixture that contains more than a thousand different compounds. We use water to get some of these chemical compounds out of the grinds and into our cups. Of these compounds, some will dissolve into the water and some are insoluble. Most of the insoluble particles remain in the coffee bed; however some make it through the filter. The ones that make it through contribute to the mouthfeel of the brew.
The compounds that are soluble may contribute to the overall flavour. They extract at different rates, with shorter chain molecules dissolving quickly and the heavier, longer chain molecules at a slower rate. The shorter chains tend to be volatile while the longer chains are non-volatile. As we drink the brew, compounds run over our tastebuds and we’ll perceive them as taste. The longer chain compounds also increase the mouthfeel of the brew. The short chain molecules may either stay in the liquid or fly off into the air as aromas that course up the back of our throats to our nostrils and land in a nest of receptors below the olfactory bulb.
The first flavour compounds to come out of the v60 cone are aromas. They are predominantly stored in the lipids that cling to the cell walls. The lipids are the first substances to diffuse into the hot water. Along with the undissolved solids and long chain molecules, they provide texture. Sour-tasting compounds then quickly dissolve and come out over the first few seconds of drip. After about the ten second mark, the sweeter-tasting compounds dissolve and start to be extracted. Later on, the bonds holding the longer chain, bittersweet compounds hydrolyse, and these compounds diffuse into the liquid and some will pass through the filter cone becoming a part of our brew. After a certain point, the remaining liquid will either be insipid or bitter.
Neither insipidity nor bitterness improves the flavour of our brew. We therefore need to stop the extraction at the point when we have more ‘nice’ in the cup than ‘nasty’. The way to work out when to stop is simply to stop the test, taste the results, and learn for next time. We achieve the best brews through precise, repeatable experimentation.
This is a simplified timeline for the extraction of flavours, holding true for many ‘safe’ coffees. Some of the more interesting coffees, however, have both tasty and unsavoury flavours that come through early. The trick is to extract enough of the nice flavours to colour the bad and turn it into something that is interesting and delicious.
Coffee extraction
Extraction is your job.
It is fundamental to our game of coffee making.
We use water to extract the flavour compounds from coffee grinds. We control how much we extract and, to some degree, what flavours, but fundamentally all we are doing is using water to get the flavour out of coffee.
Amount of extraction
Extracting the right amount of coffee is like selecting a ripe apple. Not everyone agrees at what point an apple is ripe. We are unanimously sure, however, when an apple is unripe because it will be very sour, as well as when an apple is too ripe, as there will be brown putrefaction patches spreading out over its surface. Different people will have preferences for different flavours somewhere between the extremes of ‘sour’ and ‘putrid’, but the sweetest apple possible is arguably the one you get just before the ‘nasty’ moves in.

The same can be said for coffee. We are all looking for the sweetest possible extraction without the dry or bitter flavours dominating the flavour mix. We call this spectrum of sour through sweet to bitter the taste balance.
Around 28% of the coffee bean is water soluble. However, extracting this much of the coffee would taste very bitter. On average, an extraction of around 18-22% usually falls into the zone of ‘tasty’. There’s a phenomenon that Scott Rao terms the 'double hump' in the Professional Barista's Handbook. Some people find an area of around 15–16% extraction tasty. Vince Fedele of VST fame suggested that those people are just wrong, and I agree, but even so there are more fruity flavours in this area than there are in the 16–18% zone.
This phenomenon can lead to confusion when our trial shot is within this zone: if we make a brew that tastes too sour and we decide to grind finer for next time, we might be left finding that the second time round the brew still tastes sour, but also less interesting. It may be that the first brew was around 16% extraction, which is within the ‘double hump’, and we took the extraction outside of 16.8% by making the grind finer. We may need to go another couple of steps finer before we get to into the 18–22% zone.
18–22% extraction is a guide and can't be more precise because we're measuring an average extraction of the various sized coffee grinds (more of this in Chapter 3 on grinding), using beans from different origins, using water of different compositions (more of this in Chapter 2 on water) and using different preparation methods. We determine the ‘correct’ amount of extraction for a specific brew by tasting and adjusting the variables (more on these in the Manipulating the Flavour section) until we taste a good cup.
In the next few pages we look at the processes and factors that affect the extraction. This is the theory behind extraction and it get a bit dense in places. Persevere with it! It's not too much and it's important to your understanding of brewing so that you can get the flavours you want in the cup.
Contact time
Contact time is the time that the water spends in contact with the coffee grinds. It’s the easiest variable to manipulate, and for immersion brewing it’s the easiest variable to play with. Although flowrate, and therefore contact time, is an important variable in drip and pressure brewing, surface area plays a much greater role in determining the extraction rate in these brewing methods.
Surface area
The greatest factor that affects the rate of extraction is how much the coffee surface area is exposed to the water. We’ll examine this in greater detail in Chapter 3 on grinding, but for now it’s important to know the following: finer grinds equal an increased surface area, while coarser grinds equal less surface area.
Evenness
Much of making good coffee comes from making it more ‘even’: we pick cherries for an even level of ripeness, we grade the beans so that they’re evenly sized, we roast with high air-flow to roast the beans as evenly as possible inside and out, and we use grinders that produce particle grinds that are more even. The more even the coffee is, the easier it is to brew and the greater the clarity of the flavour will be. Variations in the coffee may add complexity, but that is inherent to the process and it is not our role to add to it. Our role is to simply extract as evenly as we can.
Extraction processes
Several physical and chemical processes are at work when extracting flavour compounds from coffee grounds. Diffusion (Figure 1.5) pushes compounds from an area of higher concentration to an area of lower concentration, hydrolysis is when water reacts with insoluble compounds to loosen them from the cell walls, and dissolution works on water soluble compounds.
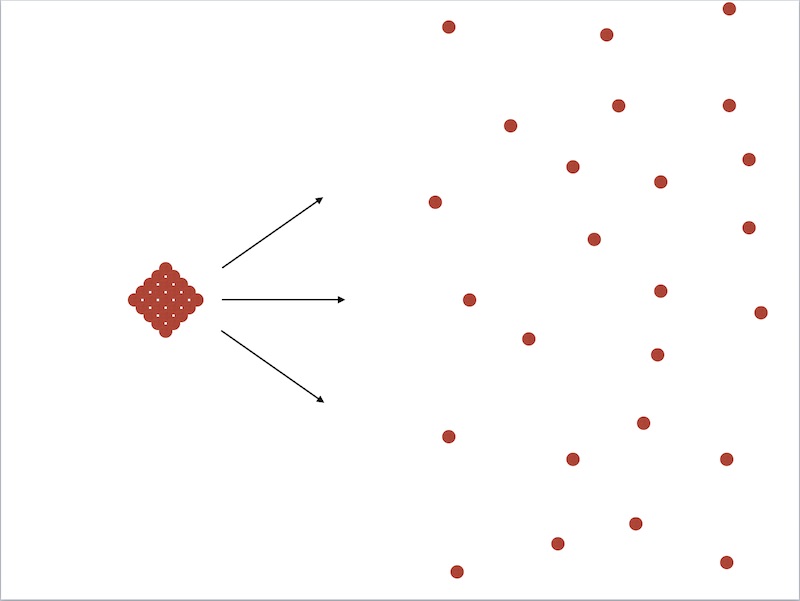
Figure 1.5 Diffusion
All of these processes work like an anti-capitalism mob ironically looting an electronics store: smashing windows, prying open shutters, storming right through the front door and carrying out everything that isn’t nailed down. The first to go are the items on the shelves outside the shop. Then someone smashes the window and his mate takes the items in the window display. Next, someone breaks in and the phones and gadgets are passed out, followed by the SLR cameras. After some organisation, the doors come off their hinges, the mob teams up to carry off the heavy wide-screen televisions and, finally, all the furniture and fittings.
It’s a similar process with coffee: as the water washes through the coffee grinds, any loose items are carried off first. Then the water surrounds the coffee cell, and the exposed soluble compounds quickly start to dissolve. The water next reacts with some insoluble compounds as well as some of the larger soluble compounds, prying them off the cellulose walls. The gas inside the coffee cells expands as it heats up and the cell floods with water. This creates a pressure gradient across the cell wall that the compounds move across by diffusion.
Turbulence
Turbulence speeds up the rate of extraction. It can be caused by agitation, any shaking or stirring action (Video 1.4), pouring, or gas escaping. Turbulence is chaotic and impossible to repeat exactly. However, we will always use some kind of turbulence in our coffee preparation, just adding water to the coffee is turbulent and so is stirring to wet all of the grinds.
We can observe the difference between still and turbulent brewing by placing two tea bags (not, dear barista, that I presume you to ever drink anything but loose-leaf) into two separate glasses of water at the same time. Leave one to soak and stir the other for 10 seconds. Remove the tea bags and observe the difference in colour between the two glasses.
Generally speaking, it is better to keep turbulence to a minimum. However, turbulent extraction may produce different, sometimes even better, results. If preparation allows, experiment with both still and turbulent extraction methods.
Concentration
Concentration, or strength, is often misunderstood. People often use strength to refer to the roast level of the coffee beans and the viscosity or the intensity of the brew. Concentration is a measure of the dissolved solids (coffee) in the brew (beverage). It should be considered, as James Hoffmann once put it, in the same way as the percentage of alcohol on the label of your favourite beer.
Concentration is like a bus of 38 people pulling up outside a Starbucks and a Bitches’ Brew Coffee. Starbucks has a seating capacity of 100 and Bitches’ Brew Coffee has a seating capacity of 16. 20 of these people go into Starbucks and 18 go into Bitches’ Brew. Although Starbucks has ‘extracted’ more people out of the bus, it’s quiet, sterile and dull inside, with only 1/5 of the seats taken. Bitches’ Brew, however, is humming with people. The concentration of people at Starbucks (20/100 = 20%) is much less than at Bitches’ Brew (18/16 = 112.5%).
For coffee brews, we measure concentration in Total Dissolved Solids (TDS). In the above example, the people in each of the cafes are like dissolved solids and the size of the cafe represents the volume of the beverage. TDS is the dissolved coffee as a percentage of the entire volume of coffee. Because 1 mL of water is close to 1 g of water, it's easier in practice to measure volume in grams.
For immersion or drip brewing methods, TDS is usually around 1.1-1.5%. For espresso, it’s usually around 8-14%. So a weak brew of drip coffee is around 98.9% water and 1.1% coffee. A strong brew is 98.5% water and 1.5% coffee.
The TDS percentage is the amount of extracted coffee in the beverage:
TDS (%) = dissolved solids (g) / beverage weight (g) x 100
We can also work out the TDS from the extraction percentage by using this formula:
TDS (%) = extraction (%) x dose (g) / beverage weight (g)
(or, put more simply: strength = extraction x brew ratio)
The 'beverage weight' is the liquid coffee, also known as ‘yield’. The latter formula is the one we use for drip or pressure brewing. For immersion brewing, we substitute the beverage weight for the brew water weight.
For those of you who are more visually minded, take a look at the coffee brewed using the v60 preparation method in Figure 1.6. We grind the beans, add the water and brew the coffee. The spent grinds are left behind in the filter paper and the dissolved solids go into the beverage.

Figure 1.6 Working out the TDS
Boiling the water off the brew will leave behind a fine powder. The TDS is the weight of this powder given as a percentage of the weight of the whole beverage (water and dissolved solids together).
Measuring the TDS doesn't tell us much about what's in our coffee. It's like talking about the opacity of the liquid rather than what colours make it up.
There are two ways to change the coffee strength: (1) change the brew ratio by changing the dose or brew water, or (2) extract more or less from the coffee grinds. We can end up with the same TDS and very different tasting coffee. To understand why, let's get out the gobstoppers…
Gobstoppers, for anyone with a deprived childhood, are hard round sweets that are made up of multiple layers, each of a different colour and flavour. If we take a gobstopper and put it into a cup of acid, the layers would start to dissolve and we would see the acid change colour, much as water changes colour when we add our coffee grounds. The opacity, or thickness, of the colour in the acid is like the TDS, and tells us that there is a level of colour in the acid, but doesn't tell us what layers the colours came from.
Let's say that it takes 1 minute to dissolve the first layer on a normal sized gobstopper and a little more for each subsequent layer. We can change the opacity of the acid by changing the ratio of gobstopper to acid. Even if we keep the time at 1 minute, the opacity would change because we've either more or less gobstopper or more or less acid. This is the effect of changing the brew ratio. We can also change the opacity by dissolving more layers by changing the time, by using different sized gobstoppers to change the surface area exposed to the acid, by stirring the mixture or by changing the temperature. This is the effect of changing the extraction. Have a look at Video 1.5 to see this graphically.
Strength is a matter of personal preference, as evidenced by the wildly different TDS recommendations from the Norwegian and American coffee associations in Table 1.2. One Norwegian’s ‘rich’ may be an American’s ‘intense’, whereas an American’s ‘gentle’ is, to the hardy Norwegian, ‘insipid’.

Table 1.2 Various coffee associations’ guidelines
Refractometer
The process in Figure 1.6 is laborious and made redundant if you happen to have a light source, a prism and a linear detector array (a.k.a. a refractometer﹣Figure 1.7) at your disposal. A refractometer shines a light through a sample of the coffee and measures its temperature and refractive index. From this, it can infer the TDS. The refractometer doesn’t measure extraction, but by using the TDS, knowing our brew ratio and using the second TDS formula or the CoffeeTools app, we can work out how much coffee we’ve extracted.

Figure 1.7 VST Refractmeter
Not every cafe has a refractometer sitting around in a drawer. Even if your cafe does, customers might be less than impressed if you pulled it out to check extraction percentage mid-service﹣especially if you’re waiting for your sample to cool to room temperature before taking the reading. However, the refractometer is a great bit of kit to train our judgment of extraction and help us quickly get into the zone of good tasting coffee. If we use it to dial in at the start of the day, it can really help us to understand how the changes we make affect the extraction and TDS of the brew.
Coffee brew ratio
In coffee-making, we use the terms ‘dose’ for coffee grinds, ‘brew water’ for water, and ‘beverage weight’ for liquid coffee. The brew ratio is the ratio of the dose to the brew water and is written as: X g dose/X g brew water or as a simple number ratio X:X. Since the popularisation of the VST refractometer, many people have preferred to reduce the figure to a simple number dose multiple, so 12 g coffee to 200 g water becomes 16.7. Although I prefer the elegance of this, it confuses many people. To keep it clear, I’ll use the form X:X, in this case 1:16.7.
We use ratios for coffee, just as we do with recipes. For example: a meringue is egg white and sugar baked to gooey chewiness encased by a crisp, crunchy, sugary shell. 1 egg white and 60 g caster sugar would make 4 meringues.
We can easily make any number of meringues by using the ratio of egg whites to sugar, which is 1 egg white to 60 g sugar or 1:60. If we wanted to produce 20 meringues, we’d simply multiply this ratio by 5 (20 meringues/4 meringues = 5). Therefore, we’d need 5 egg whites and 300 g sugar.
That’s enough of the sugar, kids! Preferences for brew ratio of drip and immersion brewing vary from 1:25 to 1:10 in different parts of the world. Because immersion brewing leaves more extracted coffee in the coffee bed, most people prefer a higher brew ratio for immersion brewing. It’s okay to have your own preference﹣flavour is subjective. I encourage you to ignore what everyone else in your town is doing and to experiment with different brew ratios. I’ll give you my own preferences in the next section.
Question: If you want a coffee brew ratio of 1:13.3, what dose would you need to brew with 200 g of water?
The answer is in the black rectangle below. If this question’s still grinding down your bean, check out Video 1.6 on ratios.

Answer to question above: 200 g / 13.3 = 15 g.
We don't use 'coffee brew ratio' for espresso because it's more difficult to measure the brew water. We'll look at the espresso brew ratio later. For now, let’s now have a closer look at the dose, brew water and beverage weight.
Dose
The dose is the weight of the coffee grinds that we’re using. When we change our dose, we change the brew ratio and therefore the strength of the beverage. For immersion brewing, changing the dose results in a relatively proportional change in flavour. However, for drip and pressure brewing it gets a bit more complicated.
In drip and pressure brewing, changing the dose to alter the beverage concentration will also change the preinfusion rate, flowrate, extraction evenness, extraction yield, extraction temperature and total permeable grinds.
For these reasons, it’s generally better to start with a certain dose and just work with it.
That’s not to say that you should never change the dose to alter the flavour. If you’re mid-shift, half-way buried in chits and have just changed to a new bag of coffee that’s tasting a bit insipid, upping the dose may give it the kick it needs. That being said, it’s still a compromise not entirely unlike snorting amphetamines to get a job done: it may work temporarily, but your customers (and workmates) are going to suffer in the long run.
Increasing the dose also means we’re increasing the total fines in our slurry.
Being highly mobile, fines can cause blockages and uneven extraction in drip and pressure brewing (Figure 1.8). We address fines more thoroughly in Chapter 3 on grinding but for now it’s important to remember that preinfusion, stirring and pouring evenly help to reduce clogging and uneven extraction.

Figure 1.8 Fines blockage. Excessive fines may cause blockage and uneven extraction, even in filter coffee.
Just one more point to note concerning dose: even if they’re the same model, coffee grinders are far from uniform. Each set of grinding burrs will produce a different spread of grinds, and a 20 g dose from Grinder A won’t necessarily give the same surface area as the same dose from Grinder B.
Brew water
The brew water is the water we add to the dose. It acts as a solvent for extracting coffee compounds from the grinds.
If we increase the dose and want to extract the same flavour from our coffee, we need to add more water to maintain the brew ratio. This is what we do when we cut an espresso pour at a similar extraction point at ‘blonding’.
If we change the amount of brew water while keeping the dose itself fixed, we change the concentration of the beverage. In immersion brewing, increasing the brew water will increase the temperature throughout the infusion and increase the extraction. In drip and pressure brewing, pouring more water through the coffee bed extracts more coffee by increasing the contact time while increasing the beverage weight (see Beverage weight on next page). Still, this is far less complicated than if we change the brew ratio using the dose.
So remember: if you want to change the concentration, it’s simpler to change the amount of brew water than it is to change the dose.
The other way that water can get into the brew is directly into the cup. This is called dilution. Dilution is not part of the brew ratio. Rather, it lowers the concentration of a solution by increasing its volume. We can make a long black from a short black by adding water (diluting it). Diluting a brew doesn’t affect extraction.
Once water has gone into the cup, there may be a little more extraction of some of the larger compounds that got there through hydrolysis, but these compounds would extract without the added water. Generally speaking, the process of extraction is over; all we’re doing is diluting the beverage.
Beverage weight (brew yield)
In drip and pressure brewing, beverage weight is the term for the yield in the cup. If a farmer sows her field, the yield will be the weight of coffee cherries she harvests. If we place coffee grinds in washed filter paper and pour water over them, then our brew yield is what we get in the cup below.
The beverage weight is made up of all the water we put in and the extracted coffee, minus the water still soaking in the grinds. As we saw in Video 1.6, we get more coffee in our brew either by increasing the dose-to-water ratio (so decreasing the brew yield), or by extracting more. To extract more, we either need to increase the brew water-to-dose ratio, which increases the brew yield, grind finer to increase the surface area or simply brew for longer. We brew for longer by increasing the preinfusion time or grinding finer or by manually or mechanically slowing the flowrate.
Video 1.7 illustrates the differences between concentration, dilution and beverage weight.
If all that seems a little too complicated, it’s because our ménages à trois of beverage weight, concentration and extraction is easy to misinterpret. One extreme is a brew that’s strong, thick, aromatic and sour, and the other extreme is a brew that’s weak, thin, dull and bitter. The ratios in between these extremes are the ones that we want: those that create a sweet and complex partnership of aroma, mouthfeel, body and aftertaste. What those ratios are and what’s best for you and your customers is, as poly-relationships always are, a compromise, entirely personal, and best worked out through clear communication.
Look at the graph in Figure 1.9. The beverage weight is given on the bottom (x-) axis and increases as our cup fills up. Extraction starts low and increases as we pour more water through the coffee grounds. The concentration (TDS) shoots up as the water washes out the loose compounds and extracts the fines; as the beverage weight increases, the concentration will decrease, despite continued extraction.

Figure 1.9 Concentration and extraction vs. yield
If we were to stop pouring the water at 60 g, the result would be an overpowering TDS of 1.85% and a sour 9.4% extraction. At 250 g, our TDS will be a flaccid 0.75% and the 16% extraction will be so drowned in water that it’d be hard to detect its tart sweetness. In short, nowhere on this graph would we get a decent brew.
In this case, the idea is to increase the extraction without increasing the beverage weight. We can do this by increasing the dose, preinfusion time, or by grinding more finely. As changing the brew ratio only complicates matters and changing the preinfusion time is too fine an adjustment, the best option, in this scenario, is to change the grind size to push up the extraction curve.
A summary of the effect of some of the variables above is shown in Table 1.3.

Table 1.3 Effect of variables on extraction. *Beyond a point, grinding finer will start to decrease extraction for pressure brewing.
That's the end of the background theory of coffee extraction. Next we'll look at the practice of brewing coffee before having a closer look at how we can combine the theory and the practice to manipulate the flavour of our brew.
Brewing methods
Brewing methods are those that we use to extract the coffee. This is not the same as the preparation methods, which refer to the method we use to brew using specific preparation devices such as the syphon, cafetière (French press), espresso machine, etc.
Most preparation methods have characteristics of different brewing methods. However, we can give a general picture of the main methods of brewing: immersion, drip, and pressure.
Immersion
For this method, the coffee is completely immersed in water throughout the percolation. When we pour the coffee out, the water remaining with the grinds has the same concentration as the brew. To obtain the same strength as a drip coffee, use a higher brew ratio for immersion brewing or brew with an added flush. Examples are: camp coffee, filter bags, ibrik, cafetières, steampunk, aeropresses, syphons, clever drippers, and trifectas.
Drip
For this method, the water passes through the bed by gravity and can be manipulated by the rate of pouring. Examples are: v60 filter cones, automatic drips, mellita cones, chemex and phoenix.
Pressure
For the pressure method, water is forced through the coffee ground bed under pressure. This is commonly known as ‘espresso’ and the standard is 9 bar at 90–97ºC (194–207ºF).
Other methods
Stimulated baristas are always coming up with more ways to steep. Cold brewed coffees are becoming more common and there are many new devices coming out that use vacuum.
Cold coffee
Ice-drip, cold brew and nitrogenated coffees used to be the sole domain of specialist shops but are now becoming more mainstream in third-wave cafes. Due to the difference in brewing temperature, ice-drip doesn’t behave like drip coffee and cold brew doesn’t behave like immersion brewing.
Vacuum
The molecular gastronomy movement started playing around with vacuum extraction and the ever-excitable coffee community naturally took it in with open arms. Many people use the vacuum chamber used to seal coffee bags at roasteries.
There are several preparation devices that use vacuum to extract the grinds: the BKON uses cycles of vacuum and immersion to extract compounds from dried food and coffee. Ground Control from Voga Coffee uses cycles of immersion and vacuum to layer up extraction flavours in their batch brewing system. The method has interesting possibilities, and can extract more from less coffee, but is not yet widespread.
Further considerations
Chaff
Unpolished green beans have thin silverskin around them. Most of the silverskin comes off during roasting and we call it 'chaff'. In darker roasts, nearly all the silverskin comes off but we can still see it nestled in the cracks of lighter roasted beans.
Chaff tastes like boiled wood and termites love it but baristas should avoid it. When grinding the beans for filter coffee, much of the chaff sticks to the inside of the grinding chute. This is a good thing. Then the barista flicks the knocker a couple of times and the chaff flitters like decaying butterflies into the cup. This is a bad thing.
Bloom
Fresh coffee has gas, mostly carbon dioxide (CO₂), trapped within the beans. About half of the CO₂ in freshly roasted coffee is released within five minutes of grinding. When we pour hot water onto our fresh grinds, the gas releases to form a floating mass of grinds and CO₂ called the ‘bloom’ (CO₂ isn’t soluble above 80ºC (176ºF)). Although fresher coffee is generally best, it also has more CO₂ to release and too much bloom can keep some grinds separated from the water for too long, leading to the underextraction of those grinds. Stir the bloom to extract the grinds more evenly.
Temperature
Most organic compounds become more soluble at higher temperatures as the water has greater thermal energy to enable reactions with the compounds. However, as shown in Figure 1.10, the solubility of organic and inorganic compounds varies widely between different compounds and some compounds become less soluble at higher temperature.

Figure 1.10 Solubilities of Several Inorganic and Organic Solids in Water as a Function of Temperature
We can change the temperature of the water that we use in order to manipulate the flavours we extract. Even so, as we’ll see in Chapter 2: Water, extraction is complicated enough as it is without having to change the temperature of water as well. Feel free to experiment, but be aware that with temperature fluctuation, you’re only adding another layer of complexity to an already elaborate system.
To get consistent brews, we need to ensure that the temperature profile is always the same during our brewing process. That’s not the same as a constant temperature: to get a constant temperature throughout the extraction process, we need to use a high-end espresso machine or a brewing device that maintains the set temperature. A consistent temperature profile means that the water at any given time will have the same temperature from brew to brew. So, if the initial temperature of one brew is 100ºC (212ºF) and the temperature in the slurry at 2 minutes is 70ºC (158ºF), then a consistent second brew would also need to have an initial temperature of 100ºC (212ºF) and 70ºC (158ºF) at 2 minutes. Most preparation methods vary significantly in temperature throughout the brewing, but as long as the environmental temperature is the same, with careful attention, the profile and the resulting flavours in each brew can be replicated.
For consistent immersion brewing, ensure that the amount of water we use is consistent between brews. More water has higher thermal mass, and supplies more heat energy resulting in faster and possibly different extraction. Best practice is to weigh your water first, then quickly add the pre-weighed grinds to ensure that the thermal mass is the same each time.
For consistency, use water straight off the boil. The water will always be 100ºC (212ºF). It’s a common assertion that boiled water ‘burns’ coffee. It doesn’t. If your coffee has been roasted for use with boiled water, it’ll taste great. Using water straight off the boil means you can forget temperature as a variable and concentrate on the other variables of flavour manipulation.
A good deal of heat is lost between the kettle and the slurry in drip brewing. Even using water from the boil the temperature in your slurry is likely to go lower than 75ºC (167ºF) during the extraction. To keep the slurry temperatures high, you need to pre-heat the equipment as well as using water from the boil.
Although I advocate using hot water, using water at different temperatures does produce different results and I’m all for consistent experimentation. There are kettles that heat up to specific temperatures before cutting out; alternatively, it is possible to change the temperature by adding a measured dose of cold water to the boiled water.
Filters
At some point we want to remove our brew from the coffee grinds. We usually do this using a filter. The type of filter we use will affect the flavour and texture of the brew. There are various types of filters and using a different filter with the same preparation method produces markedly different results. Filters dictate the size of the grinds that make it into the brew, the amount of oil that gets through, and they also affect the flowrate and drawdown time.
Most filters are made from paper or metal. Paper filters should be washed before use, to prevent adding paper to your tasting notes. Metal filters should be cleaned often to prevent old coffee residues contaminating the flavours of your fresh brew.
Stale coffee
Coffee only really goes stale when oxygen degrades the flavour aromas and the oils go rancid. The rate at which the flavour compounds become damaged after grinding is often exaggerated: depending on how the grinds are stored, we can still get half-decent coffee from them, even if they are several weeks old. However, as grinds rapidly absorb smell and moisture, it is best practice to use the grinds as soon as possible after grinding.
A more important point to consider over staling is the consistency in CO₂ levels between brews. Different amounts of CO₂ lead to different levels of bloom and different flowrates. The best way to get consistency is to grind the beans and brew from them immediately.
Now that we’ve had a look at what goes on when we brew, it’s time to look at the brewing methods to see how we brew.
Key Learning Points
- There are many chemicals in coffee and we don’t want all of them in our cup.
- It is possible to extract 28% of arabica coffee.
- Average extractions of 18-22% are likely to taste nice.
- The more even the coffee grinds, the more even the extraction.
- Turbulence increases the rate of extraction.
- Concentration = strength = TDS.
- The ‘dose’ is the weight of coffee grinds.
- The ‘brew ratio’ is the ratio of the dose to the brew water.
- The ‘beverage weight’ is the weight of the brew in your cup and is also called ‘brew yield’.
- As the beverage weight increases, the extraction increases and the concentration decreases.
- There are three main types of brewing methods: immersion, drip, pressure.
- We need to brew with consistent temperatures to get consistent flavours.
Review of Thinking About the Brew
Question 1
What are the first flavour compounds to be extracted from coffee?
- Sour compounds
- Acids
- Aromatics
- Oils
Question 2
What is the first taste that is extracted from coffee?
- Sour
- Bitter
- Salty
- Sweet
Question 3
What’s the maximum coffee % that water can extract at below 100°C (212°F) and one atmosphere?
- Until it’s bitter
- 1.35%
- 28%
- 18 - 22%
Question 4
Which coffee grinds have the greatest surface area?
- Fine
- Coarse
Question 5
Which three processes help to extract coffee in water?
- Hydrolysis
- Diffusion
- Dissolution
- Deliquescence
Question 6
What is the result of turbulence?
- CO2 expands out of the coffee cells
- More extraction occurs
- Faster extraction occurs
- The liquid carbonises
Question 7
What is otherwise known as the strength of the coffee? (Choose all that apply)
- The roast level
- The concentration
- The percentage of total dissolved solids
- The ratio of coffee to milk
Question 8
If a filter coffee has a TDS reading of 1.35%, what percentage of the brew is water?
- 30%
- 100%
- 98.65%
- The extraction percentage minus 1.35%
Question 9
“Concentration is a measure of the _________ (coffee) in the _________ (beverage). It should be considered in the same way the percentage of cocoa on bars of chocolate.” Choose the missing words.
- Grinds
- Dissolved solids
- Brew
- Slurry
Question 10
What level of extraction tastes good?
- We’ll only know when we try it
- 19%
- 30%
- 16 - 18%
Question 11
What average percentage of extraction usually tastes good?
- Total extraction divided by the number of grinds
- 18 - 22%
- 28% at one atmosphere
- 16 - 18%
Question 12
How do we measure concentration in the speciality coffee industry?
- Dissolved solids
- g/L
- Number of moles of the solute divided by the volume of the solution
- Total dissolved solids
Question 13
What is the ‘double hump’?
- The effect in heat-exchange machines requiring a cooling flush
- The sandy feeling you get from too many fines in the cup
- The area of increased fruitiness at around 15-16% extraction
- When the pump is required for both brewing and filling the main boiler
Question 14
Which are the two correct equations for working out the TDS?
- TDS (%) = brew ratio (g/g) x coffee grounds (g)
- TDS (%) = dissolved solids (g) / beverage weight (g) x 100
- TDS (g/L) = coffee grounds (g) / liquid coffee (mL)
- TDS (%) = extraction (%) x dose (g) / beverage weight (g)
Question 15
What does a refractometer measure? Choose all that apply.
- Extraction
- Total Dissolved Solids (TDS)
- Refractive index
- Coffee solids
- Temperature
Question 16
One coffee uses 9 g coffee grinds to 200 mL water and another coffee uses 16 g coffee grinds to 150 mL water. Which coffee has the greatest concentration?
- 9 g / 200 mL
- 16 g / 150 mL
- The concentrations are the same
- We can't tell because we don't know how much coffee was extracted
Question 17
A coffee brew ratio of 1:16.7 gives us how many grams of coffee to 100 g of water?
- 0.6
- 1.67
- 16.7
- 6
Question 18
"Preferences for brew ratio of drip and immersion brewing vary from _____ to _____ in different parts of the world." Choose the missing ratios below.
- 1:1
- 1:4
- 1:25
- 1:10
Question 19
Changing the dose in drip or pressure brewing changes which of the following? (Choose all that apply)
- Preinfusion rate
- Flowrate
- Extraction yield
- Extraction temperature
- Total fines
- Extraction evenness
Question 20
How do we measure the brew yield? (Choose all that apply)
- Weigh the liquid in the cup
- Weigh the brew water
- Use a refractometer
- By beverage weight
Question 21
If I use 15 g of coffee to get a brew yield of 200 g and my extraction is 20%, by how much will I reduce my extraction if I add 50 g of water to the cup?
- 4%
- 25%
- 1.25%
- No change
Question 22
Is this brewing method immersion, drip or pressure?

- Immersion
- Drip
- Pressure
Question 23
Which brewing methods do the pictured preparation devices use?

Immersion, drip & pressure (choose one for each preparation)
Question 24
Which of the following preparation devices use the immersion brewing method?
- Melitta
- Ibrik
- Syphon
- Clever Coffee Dripper
Question 25
Changing which variable would most likely change the graph results from the faded to the brighter curves?

- Increased dose
- Decreased dose
- Finer grind size
Question 26
What are the three main types of brewing method? (One answer)
- Agitation, diffusion, dissolving
- Immersion, drip, pressure
- Turbulence, diffusion, dissolving
- French press, v60, espresso machine
Question 27
Which gas is the most prevalent in the coffee bloom?
- Carbon monoxide
- Carbon dioxide
- Sulphur dioxide
- Methane
Question 28
At what temperature does water boil at one atmosphere?
- 100ºC (212ºF)
- 125ºC (257ºF)
- 96ºC (205ºF)
- 70ºC (158ºF)
Question 29
If we want the temperature in our v60 slurry to be 91-94ºC (196-201ºF), how high should we heat the water in the kettle?
- 94ºC (201ºF)
- 100ºC (212ºF)
- 91ºC (196ºF)
Question 30
Water that is just off the boil will end up burning the coffee.
- True
- False
Question 31
When is coffee considered to be stale? (Choose all that apply)
- Five minutes after grinding
- When oxygen degrades the aromatics
- After one month
- When the coffee oils become rancid
Review 1.2 Answers
Question 1
Correct answer: C
Question 2
Correct answer: A
Question 3
Correct answer: C
Question 4
Correct answer: A
Question 5
Correct answers: A, B, C
Question 6
Correct answer: C
Question 7
Correct answers: B & C
Question 8
Correct answer: C
Question 9
Correct answers: B & C
Question 10
Correct answer: A
Question 11
Correct answer: B
Question 12
Correct answer: D
Question 13
Correct answer: C
Question 14
Correct answers: B & D
Question 15
Correct answers: C & E
Question 16
Correct answers: D
Question 17
Correct answer: D
Question 18
Correct answers: C & D
Question 19
Correct answer: A, B, C, D, E F
Question 20
Correct answers: A & D
Question 21
Correct answer: D
Question 22
Correct answer: A
Question 23
Correct answer: Red cup drip; French press immersion; black cup pressure.
Question 24
Correct answers: B, C, D
Question 25
Correct answer: C
Question 26
Correct answer: C
Question 27
Correct answer: B
Question 28
Correct answer: A
Question 29
Correct answer: B
Question 30
Correct answer: B
Question 31
Correct answers: B & D
I'll get the next section up soon.